


RADIO SYSTEMS CORPORATION
PetSafe Microchip Cat Flap
SKU: PT0137016145White, Clear, 1ea
Couldn't load pickup availability
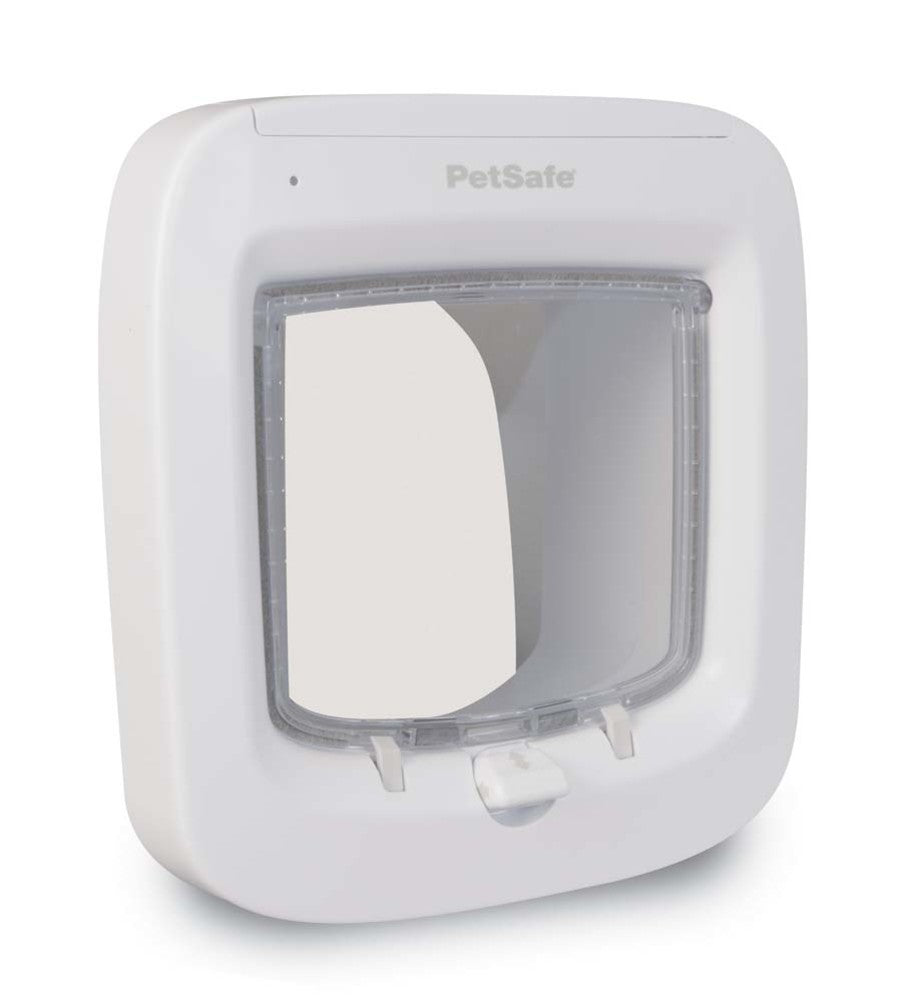
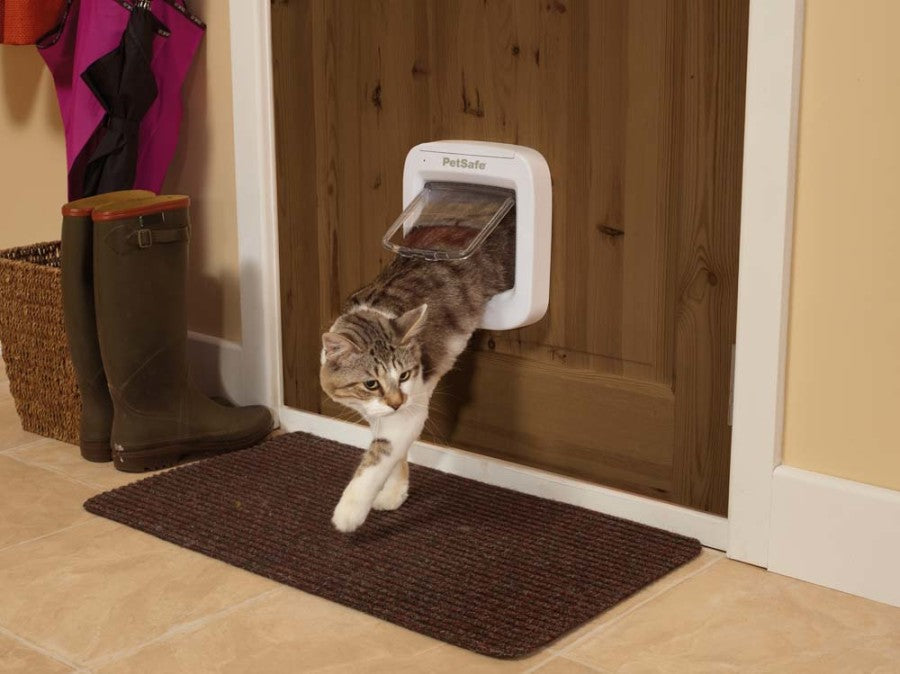
The PetSafe Microchip Cat Door is the perfect solution for giving your cat freedom to come and go while keeping unwanted friends outside. The door reads your cat’s unique 15digit microchip ID, and only allows access to the programmed pet – no more raccoons or stray animals in the kitchen. The PetSafe Microchip Cat Door can program up to 40 pet identities, great for multi-pet households. The manual 4-way lock feature allows you to control your cat’s access, allowing you to lock it at night to keep your kitty safe inside. This door is powered by 4AA Alkaline batteries and has an estimated 12 month battery life. The low battery indicator light will flash red when it’s time to change batteries.
Dimension
Dimension
- Product Gross Weight: 2.4250 lb
- Product Net Weight: 2.4250 lb
- Product Height: 9.88 in
- Product Length: 8.88 in
- Product Width: 5.50 in
Instruction
Instruction
- Battery Required: Yes
- Batteries Included?: No
- Assembly Required?: Yes
- Assembly Instructions: Installation-Measurement and Marking:Measure the belly height of your cat. This is usually 100 mm (3 ¹₅⁄₁₆”) –150 mm (5 ¹₅⁄₁₆”).Mark this measurement on the outside of your door and draw a straight horizontal line 168 mm (6 ₅⁄₈”) long, preferably in the center of the door.Please keep in mind that this horizontal line will eventually be the bottom of the hole you will cut in your door. The frame of the cat flap will be 25 mm lower. If an installation adaptor is used, then the frame will be lower.Note: This line may have to be raised slightly to allow for at least 50 mm (2”) from the bottom of the door.Important: Do not cut the tunnel. Key components are contained within the tunnel and any alteration to the tunnel will affect functionality.Installation – Wooden, PVC, or uPVC Doors without Metal:Before beginning, please check if your door has a metal core. If a metal core or metal plate is found, follow the Installation – Metal or Metal Core Doors instructions.1. Attach the supplied Cutting Template to the outside of your door in the correct position ensuring that it is the right way up and level.2. Drill four corner holes with a 12 mm (½”) diameter drill bit as marked on the Cutting Template through the door. Ensure that the drill remains straight and level.3. Using a jig or key-hole saw, cut along the appropriate line as indicated on the Cutting Template.4. Temporarily place the interior frame into the cut-out. Level the cat flap until it is in the proper position in the center of the cut-out. On the outside install the exterior frame. Use a pencil to mark screw holes through the mounting holes on the exterior frame.5. Remove the interior and exterior frame and drill the screw holes with a 6mm (¼”) drill bit (Fig. F). Ensure that the drill remains straight and level.6. Clean the area from any dust, dirt or debris.7. From the interior of the home, insert the cat flap interior frame into the opening.8. From the exterior of the home, place the exterior frame onto the interior frame.9. Making sure to center the cat flap in the hole. Three (3) different lengths of screws have been provided with this cat flap. Select the appropriate length. Using a manual screw driver, screw the exterior frame to the interior frame.10. Insert the two blanking plugs over the screws on the exterior frame.11. Remove the batteries from the cat flap and wait for 30 seconds. Re-install the batteries and battery cover. The cat flap is ready to use.Installation – Metal or Metal Core Doors:Installation of the cat flap into a door containing metal will require an Installation Adaptor (sold separately) to ensure proper performance. Once this has been purchased, follow the instructions below.1. Attach the supplied Cutting Template to the outside of your door in the correct position ensuring that it is the right way up and level.2. Drill four corner holes with a 12 mm (½”) diameter drill bit as marked on the Cutting Template through the door. Ensure that the drill remains straight and level.3. Using a jig or key-hole saw, cut along the appropriate line as indicated on the Cutting Template.4. Clean the area of any dust, dirt or debris.5. Slide one installation adaptor plate over the tunnel on the interior frame of the cat flap.6. From the interior of the home, insert the cat flap interior frame with installation adaptor into the opening.7. From the exterior of the home, place the remaining installation adaptor plate onto the interior frame tunnel followed by the exterior frame of the cat flap.8. Making sure to center the cat flap in the hole. Three (3) different lengths of screws have been provided with this cat flap. Select the appropriate length. Using a manual screw driver, screw the exterior frame to the interior frame.9. Insert the 8 blanking plugs into the exterior and interior installation adaptor plates and 2 blanking plugs into the exterior frame.10. Remove the batteries from the cat flap and wait for 30 seconds. Re-install the batteries and battery cover. The cat flap is ready to use. Optional: For additional support use screws that are less than half the thickness of your door to attach the installation adaptors to the door.Installation – Walls:Installation of the cat flap into a wall will require an Installation Adaptor (sold separately) to ensure performance. Extension Tunnels may also need to be purchased to ensure that the flap extends completely through the wall. Once this has been purchased, follow the instructions below. Important: Check for electrical and plumbing that could be in the wall where you wish to place the pet door. 1. Attach the supplied Cutting Template to the inside of your wall in the correct position ensuring that it is the right way up and levelNote: Depending on the presence of metal, there are two (2) options on the cutting template. Please use the appropriate line for your wall construction.2. Drill four corner holes with a 12 mm (½”) diameter drill bit as marked on the Cutting Template through the wall. Ensure that the drill remains straight and level.3. Using the appropriate tool for your home construction, such as a jig saw, cut along the appropriate line as indicated on the Cutting Template.4. From the exterior of the home, finish cutting the hole through the wall using the four corner holes drilled through the wall as a guide.5. Clean the area of any dust, dirt or debris.6. Slide one installation adaptor plate over the tunnel on the interior frame and attach it to the back of the frame using the two (2) pan headed screws (included).7. From the interior of the home, position the interior assembly on the wall and mark the four (4) screw holes on the installation adaptor plate attached to the cat flap. Remove the assembly.8. Using the proper hardware for your wall construction (not included), drill the appropriate size holes for your hardware and attach the interior frame with installation adaptor to the wall. Optional: Add tunnel extensions (sold separately) to extend the tunnels through your wall.9. Attach the two (2) included metal clips into the rectangular recesses on the remaining adaptor plate with the flat side of the clip flush with the outer face of the plate.10. Set the exterior frame on top of the remaining adaptor plate and attach using the two (2) 16mm ( ₅⁄₈”) flat head screws (included).11. From the exterior of the home, place the exterior frame with installation adaptor attached onto the tunnel of the interior frame and mark the four (4) screw holes on the installation adaptor plate. Remove the exterior frame.12. Using the proper hardware for your wall construction (not included), drill the appropriate size holes for your hardware, and attach the exterior frame assembly to the wall.13. Insert the 8 blanking plugs into the exterior and interior installation adaptor plates and 2 blanking plugs into the exterior frame.14. Remove the batteries from the cat flap and wait for 30 seconds. Re-install the batteries and battery cover. The cat flap is ready to use.Installation – Single-Glazed Glass:The PetSafe Microchip Cat Flap is designed for installation into single-glazed glass and requires a circular hole with a diameter of 215 mm (8 ₇⁄₁₆”). Your glazier will need to cut a circular hole of diameter 215 mm (8 ₇⁄₁₆”) as per the cutting template. Once a glazier has cut the hole in your glass door or window please follow the instructions below for installation.1. From the interior of the home, insert the cat flap interior frame into the opening.2. From the exterior of the home, place the exterior frame onto the tunnel of the interior frame.3. Make sure to center the cat flap in the hole. Three (3) different lengths of screws have been provided with this cat flap. Select the appropriate length. Using a manual screw driver, screw the exterior frame to the interior frame.4. Insert the two blanking plugs over the screws on the exterior frame.5. Remove the batteries from the cat flap and wait for 30 seconds. Re-install the batteries and battery cover. The cat flap is ready to use.Working with glass is a skilled job and should be carried out by a professional glazier. It is not possible to cut holes in toughened glass or double glazed units except at the time of manufacture. Please consult a glazier.Installation – Double-Glazed Glass:The PetSafe Microchip Cat Flap is designed for installation into double glazed glass and requires a circular hole with a diameter of 260 mm (10 ¼”) and an Installation Adaptor (sold separately.) If possible, have your glazier use non-metal materials when sealing the glass to prevent the cat flap’s read range from being reduced. Once your glazier has installed the new glass panel with a 260 mm hole, please follow the instructions below for installation.1. Slide one installation adaptor plate over the tunnel on the interior frame of the cat flap.2. From the interior of the home, insert the cat flap interior frame with installation adaptor into the opening.3. From the exterior of the home, place the remaining installation adaptor plate onto the tunnel of the interior frame followed by the exterior frame of the cat flap. 4. Make sure to center the installation adaptor in the hole. Three (3) different lengths of screws have been provided with this cat flap. Select the appropriate length. Using a manual screw driver, screw the exterior frame to the interior frame.5. Insert the eight (8) blanking plugs into the exterior and interior installation plates and two (2) into the exterior frame.6. Remove the batteries from the cat flap and wait for 30 seconds. Re-install the batteries and battery cover. The cat flap is ready to use. Working with glass is a skilled job and should be carried out by a professional glazier. It is not possible to cut holes in toughened glass or double glazed units except at the time of manufacture. Please consult a glazier.
Safety
Safety
- Caution: The user, prior to installation, must become familiar with all building codes that may affect the installation of the pet door and determine, along with a licensed contractor, its suitability in a given installation. This pet door is not a fire door. It is important for the owner and contractor to consider any risks that may be present inside or outside of the pet door, and any risks that may be created by subsequent changes to your property and how they may relate to the existence and use, including misuse, of the pet door.
- Safety Warnings: When children are present in the home, it is important to consider the pet door during child proofing activities. The pet door may be misused by a child, resulting in the child accessing potential hazards that may be on the other side of the pet door. Purchasers/homeowners with swimming pools should ensure that the pet door is monitored at all times and that the swimming pool has adequate barriers to entry. If a new hazard is created inside or outside of your home which may be accessed through the pet door, Radio Systems Corporation recommends that you properly guard access to the hazard or remove the pet door. The closing panel or lock, if applicable, is provided for aesthetic and energy efficiency purposes and is not intended as a security device. Radio Systems Corporation will not be liable for unintended use and the purchaser of this product accepts full responsibility for oversight of the opening it creates.
Specifications
Specifications
- Compatible With: Wood, PVC, UPVC, Metal, Glass, Brick, Wall
- Locking Mechanism: Yes
- Locking System: 4-Way
- Maximum Animal Weight: 17 Pounds
- Power Source: Battery Powered