
PREVUE PET PRODUCTS INC
Prevue Pet Products Deluxe Critter Cage for Small Animals
SKU: PT0160000484Black, 1ea
Couldn't load pickup availability
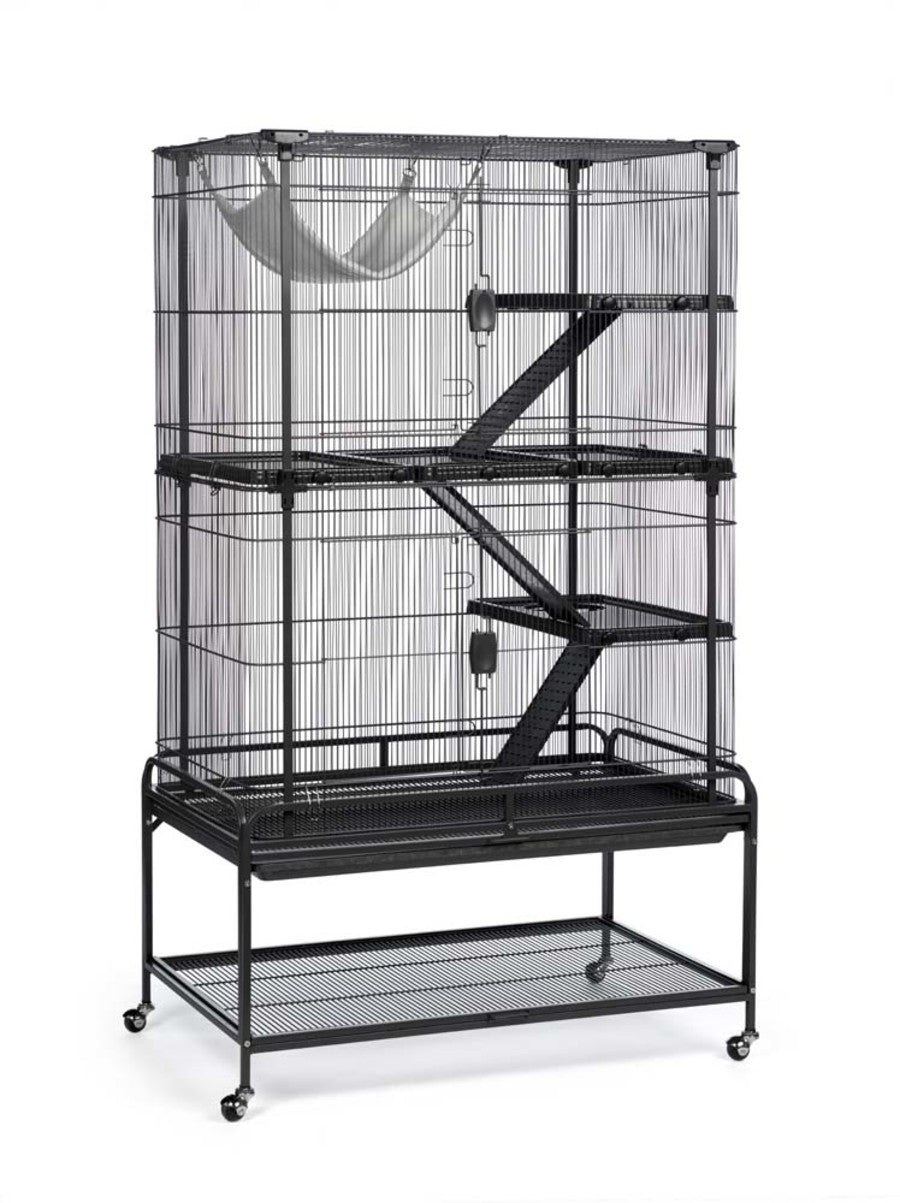
Prevue Pet Products Deluxe Critter Cage 484 is a safe and spacious home for a wide variety of small animals. Exceptional engineering makes our critter cage easy to assemble and provides a paw friendly design - no gaps or pinch points! Lightweight channel construction is heavy duty with rails, clips and alignment tabs to keep cage parts aligned, strong and sturdy. Cage comes complete with five shelves with twist knob closure, three ramps and a super soft plush hammock. Pet parents can comfortably access the cage interior through two large entry points, cage doors close easily and securely with our simple two-finger locking mechanism. Doors swing open wide providing full interior cage access for interacting with your pet or cleaning. The removable grille and tray make this cage easy to clean and are held in place with a windbell lock. A solid fit into the cage base provides extra stability while metal and hard rubber casters allow you to easily move the cage and lock into place as needed. Use the built in shelf to store extra toys or treats. Expertly engineered in the USA, all Prevue cages undergo independent lab testing to conform to the highest levels of pet safety. Suitable for small animals, ferrets, sugar gliders, rats, chinchillas, hedgehogs, tortoises, lizards, chameleons, iguanas and more, our Deluxe Critter Cage measures 37'' long, 23 1/8'' wide and 63 3/8'' high (including the stand) with 7/16'' wire spacing. Replacement platforms and ramps available separately.
Dimension
Dimension
- Bar/Wire/Mesh Spacing: 7/16 Wire Spacing
- Product Gross Weight: 61.0000 lb
- Product Net Weight: 61.0000 lb
- Product Height: 9.75 in
- Product Length: 38.75 in
- Product Width: 26.25 in
Instruction
Instruction
- Assembly Instructions: In most cases, we recommend two people assemble this cage. Attach the frame stand front panel (with windbell lock) to the side panel with one nut/screw combination at the top, and one screw at the bottom. Continue around the frame stand, attaching the frame together. Fully insert the casters into the frame legs. Prop the front panel and side panel in place. Note: Orient the panels with the thick horizontal wires to the cage exterior. Thinner vertical wires facethe cage interior. To link the panels together, slide a connector rail down over the seam until the tops are flush. Note: The flat surface of the connector rail faces the exterior. The rounded surface faces the interior. Continue around the cage, adding the panels and linking them together with the connector rails. Secure the assembled lower mesh unit to the stand with the wire clips. Two clips to every side. Use the tabs along the bottom rail of the upper-half panels toalign the upper and lower panels together. Add a connector rail at the seam to link the panels together. Continue around the upper-half mesh, adding the panels, aligning upper and lower mesh with the tabs, and linking the upper panels together with the connector rails. Secure the assembled upper mesh unit to the lower mesh with the clips on the side panels. Lay the roof panel over the top and weave the loops over and under all along the rim. Let the loop extensions of the roof panel catch over the body mesh. The catch the roof panel under the loop extensions of the body mesh. To solidify the entire cage,press a connector clip onto each panel intersection until it clicks and all surfaces are flush. “T” clips connect the intersections along the front and back rim.“+” clips connect the intersection of panels on the front and back. Slide the grilles and tray into position in the cage stand. Clip the ramp to the undersideof the platform before installing the platform into the cage. Set the first-floor platform into place, resting the tabs on the platform on the horizontal wire.Screw the knobs into the platform (two in front; two in back) to secure the platform in place. After platforms have been installed, clip the hammock to the rooftop mesh. Review the entire cage. Tighten any screws, knobs, connector clips, wire clips, and check the roof panel installation again before putting cage in use.
Specifications
Specifications
- Enclosure Type: Front
- Number of Stories: 4 Count
