LIFETIME PRODUCTS LLC
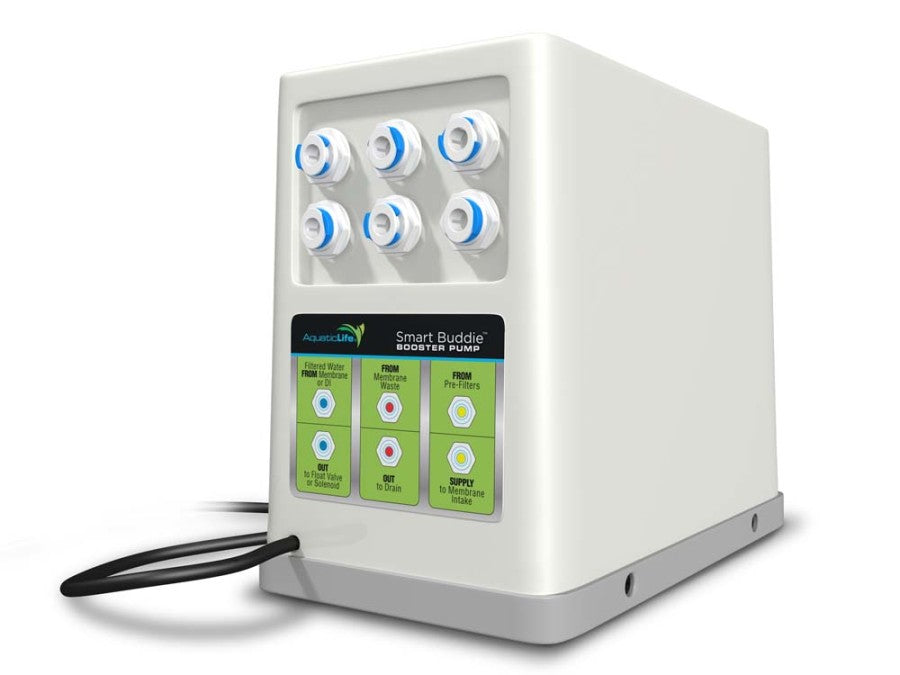
Aquatic Life Smart Buddie Booster Pump for 50-100 GPD Reverse Osmosis Systems
SKU: PT01458012921ea
Regular price
$175.44 USD
Regular price
$139.95 USD
Sale price
$175.44 USD
Unit price
per
Couldn't load pickup availability
The Aquatic Life Smart Buddie Booster Pump easily connects to 50 to 100 GPD RO and RO/DI systems, increasing the efficiency of the unit and prolonging the membrane life.
Dimension
Dimension
- Product Gross Weight: 8.2000 lb
- Product Net Weight: 8.2000 lb
- Product Height: 6.00 in
- Product Length: 12.00 in
- Product Width: 8.00 in
Instruction
Instruction
- Assembly Instructions: Please refer to the section on how to use Buddie Fit Press Fittings to ensure there are no leaks when plumbing your Smart Buddie Booster Pump. Prior to starting installation, ensure the pump is unplugged from the electric outlet. If you have a RO or RO/DI unit that includes an auto shutoff solenoid (ASO), it should be removed at this time. The ASO is not needed with the Smart Buddie Booster Pump.1. USING THE BUDDIE FIT PRESS FITTINGS:1. Remove the blue clip from the press fitting.2. Cut tubing evenly and not at an angle.3. Cut tubing evenly and not at an angle.4. Pull back on the tubing to ensure it is secure.5. Insert the locking blue clip back onto the press fitting.NOTE: To remove a piece of tubing, remove the blue clip and press down on the collet where the tubing enters the fitting. While the collet is depressed, remove the tubing from the fitting.NOTE: We recommend cutting the tubing with a razor blade or something similar, so the tubing is not pinched. If the tubing is pinched, it will not seal properly. All tubing connections will have a “double push” into the connectors. You should feel a two-step insert to verify the tubing is inserted completely into the connectors.2. SUPPLY WATER CONNECTION:NOTE: Most Aquatic Life RO and RO/DI units include color-coded tubing to make it easier to identify if water is supply, filtered or waste. There is no difference in the tubing other than color.1. Install yellow tubing between the faucet or water supply to the sediment cartridge of your RO unit.2. Install yellow tubing between the carbon cartridge to the top right port on the Smart Buddie Booster Pump.3. Install yellow tubing between the bottom right port on the Smart Buddie Pump and the supply side of the membrane housing (this is the connection on the cap)3. Waste/Flush Water Connection:1. Remove the flow restrictor that came with your RO unit. You will not use this when using the Smart Buddie Pump. The flow restrictor is typically attached to the waste water port on the membrane housing.2. Install red tubing between the waste water port on the membrane housing and the top middle port on the Smart Buddie Pump.3. Install red tubing into the bottom middle port on the Smart Buddie Pump. This is waste water and should be discarded in the drain or used to water plants. This water is not good to drink.4. Filtered Water Connection:1. Install blue tubing between the filtered water port on the membrane housing and the top left port on the Smart Buddie Pump.2. Install blue tubing into the bottom left port of the Smart Buddie Pump. This is your good filtered water.5. Connection without Deionization (DI):NOTE: If you have a deionization (DI) resin cartridge, it should be placed between the filtered water port of the membrane housing and the top left port on the Smart Buddie Pump.6. Connection with Deionization (DI).7. Place the Smart Buddie Booster Pump on a stable foundation and always create a drip loop to the electrical outlet.Connect to a power outlet.NOTE: The transformer inside the housing is low voltage and accepts universal voltage input; including 110 and 220V. However, the power plug is designed for 110 outlets.
- Use Instructions: The Smart Buddie Booster Pump is designed for residential applications. A light on the top of the unit will illuminate when the unit is operating. The unit performs the following functions when operating: Flushing the Membrane: Flushing the membrane is critical to obtaining peak performance from a RO unit. Flushing clears debris build-up on the membrane, thereby prolonging the membrane life. The Smart Buddie Booster Pump unit includes an internal automatic valve that flushes the membrane for 18 seconds every 24 hours (and when the unit is powered on). The internal valve allows water to bypass the flow restrictor located inside the Smart Buddie Pump housing. After 18 seconds, the valve will force the water to pass through the flow restrictor and build pressure against the Membrane. After flushing, Filtered Water production will begin.Low Pressure Switch: The built-in low-pressure switch will disconnect power if the source water pressure is between 4.35 and 7.25 PSI. Shutting off the source water when the pressure is low will prolong the life of the pressure pump. High Pressure Switch The built-in high-pressure switch will disconnect power if the filtered water supply line pressure is between 33.35 and 36.25 PSI. Many RO unit installations connect to storage containers that use float valves or pressure canisters that create pressure on the filtered water line. When the containers are full, back pressure on the filtered water line is created. The Smart Buddie Booster Pump unit will disconnect power to the pressure pump and prevent water flow to the membrane.Pressure Pump: The pressure pump increases incoming water pressure to 80 - 90 PSI. This higher pressure increases the effectiveness of the RO unit. The Pressure Pump is low voltage (24 V) and is powered by the included internal transformer.TIP: When using a float valve to top off a tank or sump, plug the Smart Buddie Booster Pump into a wall timer so that the power is on only once a day for an hour or two. This will prevent the pump from turning on/off every time there is a little evaporation from the sump.Unit Maintenance: Periodically inspect the unit and all tubing connections for signs of wear and leaks. Use a clean damp cloth to clean the outside of the unit housing.Deionization Resin Tips: The following tips will help you get the most out of your DI resin cartridges.TDS creep: This is when a RO unit sits for a period and there is an equalization of pressure around the membrane. Then, when new pressure is applied against the membrane, the initial filtered RO water has a higher total dissolved solid (TDS) reading.When using the Smart Buddie Booster Pump, this means the less the pump turns on and off, the less you will have TDS creep. To prolong the life of your DI resin, connect your Smart Buddie unit to a digital timer and only allow the unit to run once a day. You will make all of your water at once versus having the pump turn on and off throughout the day.New Membrane Preservative: New RO membranes are packaged with a preservative to keep them sterile. The preservative must be rinsed out of the membrane prior to using the RO water. When installing a new membrane, allow the RO unit to run 30 minutes before installing the resin cartridge. This will flush out the preservative. Otherwise, the resin will absorb the preservative.Helpful Reminders:The following tips will help you get the most out of your Smart Buddie Booster Pump. 1. Do not use an auto shutoff valve with the Smart Buddie Booster Pump.2. Do not use a flow restrictor with the Smart Buddie Booster Pump.
Safety
Safety
- Safety Warnings: Please read carefully before proceeding with installation. Your failure to follow any attached instructions and operating parameters may lead to the product’s failure.1. Do not use an auto shutoff valve with the Smart Buddie Booster Pump2. Do not use a flow restrictor with the Smart Buddie Booster Pump
Specifications
Specifications
- Compatible With: 50-100 GPD Reverse Osmosis Systems


