MILLER MANUFACTURING COMPANY
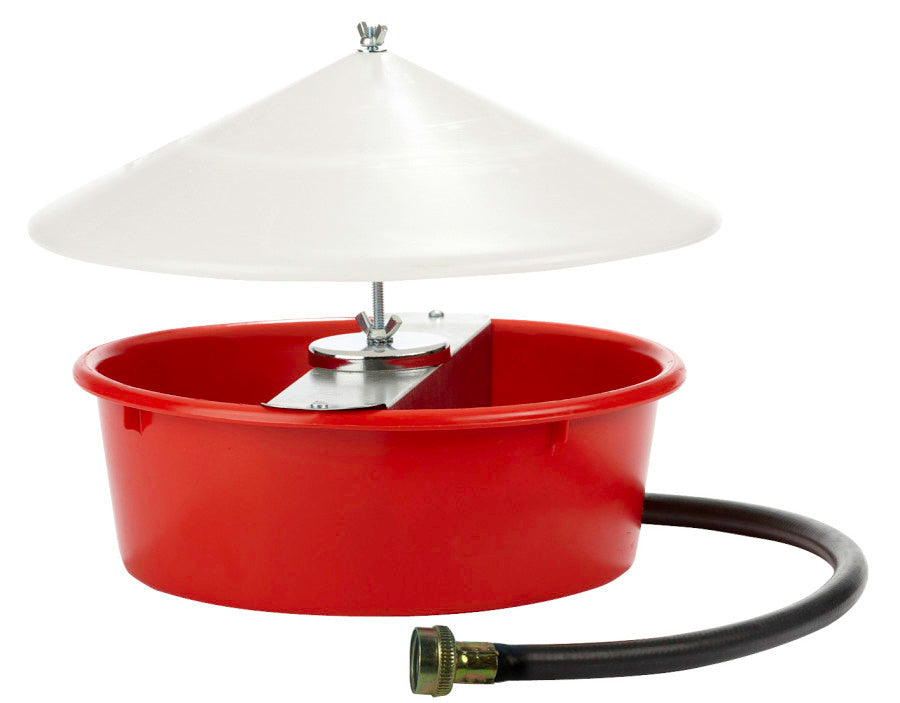
Little Giant Automatic Poultry Waterer with Cover
SKU: PT0184216638White, Red, 1ea
Regular price
$0.50 USD
Regular price
$0.00 USD
Sale price
$0.50 USD
Unit price
per
Couldn't load pickup availability
Never carry water to your birds again! Great new design includes a 0.75 inch hose that attaches to a standard garden hose for a continuous flow of fresh water for your flock. Automatic float controls the water level so there is no spilling or overflow. Oversized cover extends beyond the edge of the bowl to prevent roosting and keep debris out of the water. Easy to assemble, easy to clean. Bowl is made of high-density polyethylene, cover is white polypropylene attached to a metal bracket. Designed for use with adult birds (not intended for baby chicks). Measures 14 inch long by 12.75 inch wide by 10.5 inch high, holds 5 quarts.
Dimension
Dimension
- Product Gross Weight: 2.0000 lb
- Product Net Weight: 2.0000 lb
- Product Height: 5.00 in
- Product Length: 14.00 in
- Product Width: 14.00 in
- Capacity: 160 fl. oz
Instruction
Instruction
- Use Instructions: Preparing pan, float and hose for use: The metal float cover may be removed to help with the assembly process. (Remove screws and lift them and metal cover out.)1. Screw supplied small female adapter end onto float assembly and tighten. Make sure hose washer is in other endRecommendation: Add plumbers tape on male end of float assembly before attaching adapter.2. Screw male end of supplied hose into other end of adapter and tighten. Only attach supplied hose to adapter. Other garden hoses may leak inside adapter due to different fittings.Recommendation: Add plumbers tape on male end of hose before attaching to adapter.3. Attach female end of hose to water supply and turn water on. Wait approximately 15 minutes for float to shut water off to pan.The water level is pre-set at the factory; however, minor adjustments can be made to increase or decrease the water level in the waterer if desired.To adjust the water level, remove the metal float cover, then remove float arm assembly by pulling out the connecting pin, loosen the float mounting screw and nut with a screwdriver, then rotate the float arm up or down to achieve desired water level. Make sure you retighten the mounting screw and nut securely.Operating Tips: If the water flow does not stop:1. Make sure water supply pressure is below 50 psi.2. Make sure float arm moves up and down freely without binding.3. Make sure float is not hitting the metal float cover when closed.4. Remove float pin and float arm assembly:a. Check for water inside the float. Replace SW23 float if necessary.b. Remove any debris from valve tip or valve seal and test.c. Replace SW8 seal and test. (An additional seal is provided on the side of the float arm).d. Check SW20 valve tip for chips, surface imperfections, or cracks. Replace valve if necessary.Preparing Anti-Roosting Cover for use (No tools required):1. Remove the mounting stem with magnet and adjusting hardware from the plastic bag.2. Remove the wing nut and one flat washer from top of stem assembly. Height of plastic cover is adjustable by moving supporting nut and washers up or down the stem to desired height.3. Place plastic cover on stem and replace flat washer and wing nut.4. Tighten all hardware to secure assembly position of cover on stem.5. Apply magnet to center of metal float cover.Height of Anti-Roosting cover on stem can easily be changed Entire magnet assembly of cover can be removed if or when needed.
Safety
Safety
- Caution: Rotating the arm too far up or failing to secure the float mounting screw and nut may prevent the waterer from stopping the water supply flow and run continuously. Do not use this product in freezing temperatures.
- Safety Warnings: This product is not intended for use with baby chicks


